When creating A/B testing variations, it is essential to design them in a way that not only produces the desired results but also abides by the following key principles. Here are the top five principles to be considered when designing successful variations for A/B testing.
Branding
One of the key aspects in A/B testing is keeping the brand consistent, it is essential to ensure that any changes comply with the visual and messaging identity of your brand. This uniformity of all elements and channels strengthens the brand identity and creates trust in your audience.
Customer Journey
It is crucial to also focus on the customer Journey which involves optimizing the path users take from the first contact with your brand to the final action, such as making a purchase. The goal is to enhance this experience. Once you create hypothesis on which touchpoints could be the most important in this process, you can create experiments based on that and measure how they impact the user behavior and conversion rates.
For example, we introduced a countdown timer for the next day delivery. That same countdown timer was used on the PDPs, Basket page and the Checkout page. Having the same design for the countdown timer throughout the journey made a significant difference on the overall conversion rate.


Link - https://guessthetest.com/test/with-or-without-the-next-day-delivery-timer/
User Interaction
Another key area of high importance when designing variations is interaction. This covers the engagement with the user’s interface from the point of the first interaction to the point of conversion. When optimizing user interaction, the goal is to enhance it and make it more intuitive. It is important to strike the balance between being subtle enough not to distract the customer, but also engaging enough to achieve the desired results such as conversion rates.
We know that many people in this industry believe that CTA tests are the simplest form of tests and that people should be thinking bigger and bolder. No doubt about that! However, there have been cases where making small changes can have a large impact.
Examples of such variations would be button responsiveness - testing different feedback mechanisms such as animation on click or when hovering over the mouse - interactive elements such as sliders or expandable sections (read more), or utilizing subtle animations or motion effects on some of the critical elements like CTA’s in order to grab the user’s attention without being too distracting.
Sliders are also crucial in this context; creating sliding animations such as image carousels or product showcases can make the experience more engaging for users..
As for a specific example of successfully creating a sliders variation, the testing team producing tests for Burton Publishing has decided to create an experiment for the client testimonial section, making it more interactive by creating a slider to increase the conversion rate. The results confirmed the hypothesis. Not only did choosing the winner improve sales by 16.2% compared to the static version, but also it increased the Revenue Per Visitor by 30.7%.


Link - https://guessthetest.com/test/with-or-without-the-testimonials-slider/
Content Area
When crafting experiments, focusing on the content area is also essential. This is to examine and find out how the content arrangement affects user engagement and conversion rates. The ultimate goal of such an experiment is to enhance user retention, readability, and user engagement. This can be done by modifying the layout, content type, and overall presentation.
There are several ways of changing the content area, which may include increasing or decreasing the content length, incorporating multimedia elements (such as videos and graphics), adjusting call to action placement, headline testing, and experimenting with the ratio of image to text content. Another way of creating a variation would be producing a hero image for one of the tests and another one without such an image. Tinuiti ran this test for American Automobile Association of California with the idea that a large Click to call button would make it easier for users to request a quote.
The A/B tests have proven that indeed the interface not having the hero image and leading straight to the quote section, increased the click to call conversions by 180% making it a clear winner in this particular case.


Link - https://guessthetest.com/test/with-or-without-the-hero-image-on-mobile/
Window Resizing
If the requested tests are designed for several devices, each variation also needs to be created specifically to cater for the window size of the device it will be used on. The goal is to ensure we adapt to the layout, design, and functionality of all screen sizes to assess how these changes impact usability and conversion rates.
There are several aspects of window resizing that need to be considered:
- Functionality: Seeing that all interactive elements such as dropdowns and sliders work correctly on all devices
- Layouts: making sure the layout is consistent across devices and remains visually appealing
- Visibility: ensuring all texts, interactive elements, and images are visible without having to zoom on smaller screens
You can apply the window resizing tests by using Fluid Grid Layouts, which use the ratio percentage of the grid instead of fixed pixels, or adaptive images that adjust depending on the device.
In conclusion
Every test should not only determine which variations work better but also provide a deeper understanding of user behavior and preferences. These design principles will help you and your team to create the variations that not only “works”, but also follows the site itself and help you achieve your CRO objectives.
Reference: www.GuessTheTest.com
When creating A/B testing variations, it is essential to design them in a way that not only produces the desired results but also abides by the following key principles. Here are the top five principles to be considered when designing successful variations for A/B testing.
Branding
One of the key aspects in A/B testing is keeping the brand consistent, it is essential to ensure that any changes comply with the visual and messaging identity of your brand. This uniformity of all elements and channels strengthens the brand identity and creates trust in your audience.
Customer Journey
It is crucial to also focus on the customer Journey which involves optimizing the path users take from the first contact with your brand to the final action, such as making a purchase. The goal is to enhance this experience. Once you create hypothesis on which touchpoints could be the most important in this process, you can create experiments based on that and measure how they impact the user behavior and conversion rates.
For example, we introduced a countdown timer for the next day delivery. That same countdown timer was used on the PDPs, Basket page and the Checkout page. Having the same design for the countdown timer throughout the journey made a significant difference on the overall conversion rate.
Link - https://guessthetest.com/test/with-or-without-the-next-day-delivery-timer/
User Interaction
Another key area of high importance when designing variations is interaction. This covers the engagement with the user’s interface from the point of the first interaction to the point of conversion. When optimizing user interaction, the goal is to enhance it and make it more intuitive. It is important to strike the balance between being subtle enough not to distract the customer, but also engaging enough to achieve the desired results such as conversion rates.
We know that many people in this industry believe that CTA tests are the simplest form of tests and that people should be thinking bigger and bolder. No doubt about that! However, there have been cases where making small changes can have a large impact.
Examples of such variations would be button responsiveness - testing different feedback mechanisms such as animation on click or when hovering over the mouse - interactive elements such as sliders or expandable sections (read more), or utilizing subtle animations or motion effects on some of the critical elements like CTA’s in order to grab the user’s attention without being too distracting.
Sliders are also crucial in this context; creating sliding animations such as image carousels or product showcases can make the experience more engaging for users..
As for a specific example of successfully creating a sliders variation, the testing team producing tests for Burton Publishing has decided to create an experiment for the client testimonial section, making it more interactive by creating a slider to increase the conversion rate. The results confirmed the hypothesis. Not only did choosing the winner improve sales by 16.2% compared to the static version, but also it increased the Revenue Per Visitor by 30.7%.
Link - https://guessthetest.com/test/with-or-without-the-testimonials-slider/
Content Area
When crafting experiments, focusing on the content area is also essential. This is to examine and find out how the content arrangement affects user engagement and conversion rates. The ultimate goal of such an experiment is to enhance user retention, readability, and user engagement. This can be done by modifying the layout, content type, and overall presentation.
There are several ways of changing the content area, which may include increasing or decreasing the content length, incorporating multimedia elements (such as videos and graphics), adjusting call to action placement, headline testing, and experimenting with the ratio of image to text content. Another way of creating a variation would be producing a hero image for one of the tests and another one without such an image. Tinuiti ran this test for American Automobile Association of California with the idea that a large Click to call button would make it easier for users to request a quote.
The A/B tests have proven that indeed the interface not having the hero image and leading straight to the quote section, increased the click to call conversions by 180% making it a clear winner in this particular case.
Link - https://guessthetest.com/test/with-or-without-the-hero-image-on-mobile/
Window Resizing
If the requested tests are designed for several devices, each variation also needs to be created specifically to cater for the window size of the device it will be used on. The goal is to ensure we adapt to the layout, design, and functionality of all screen sizes to assess how these changes impact usability and conversion rates.
There are several aspects of window resizing that need to be considered:
- Functionality: Seeing that all interactive elements such as dropdowns and sliders work correctly on all devices
- Layouts: making sure the layout is consistent across devices and remains visually appealing
- Visibility: ensuring all texts, interactive elements, and images are visible without having to zoom on smaller screens
You can apply the window resizing tests by using Fluid Grid Layouts, which use the ratio percentage of the grid instead of fixed pixels, or adaptive images that adjust depending on the device.
In conclusion
Every test should not only determine which variations work better but also provide a deeper understanding of user behavior and preferences. These design principles will help you and your team to create the variations that not only “works”, but also follows the site itself and help you achieve your CRO objectives.
Reference: www.GuessTheTest.com
We have previously shared how to create targeting conditions that are dynamic and only include a visitor when they perform certain actions. That method requires updating the Global JS (Global Project JavaScript) of Convert. There is a small challenge from a maintainability perspective.
For example, if you are running 100s of experiments, maintaining all those conditions withing Global JS might cause some unforeseen issues. This has pushed us to come up with a different approach. Utilizing the JS Audience creation, that will do the same thing, without having to touch the Global JS Convert script.
Here's a step-by-step guide on how to create a custom trigger audience using JavaScript conditions.
Steps to Create a Custom Trigger Audience
1. Create a New Audience
Go to your Convert dashboard and create a new audience. Name it something descriptive like "Open Cart Drawer".
2. Add a JavaScript Condition
Drag and drop the JavaScript condition component into the audience rules conditions.
Here is an example for how the Audience setup should look like:
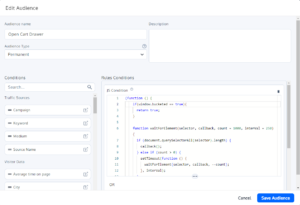
3. Write a Self-Calling Function
Within the JavaScript condition, you'll need to write a function that defines your custom logic.
Here’s a sample code snippet to get you started:
(function () {
  if (window.bucketed === true) {
    return true;
  }
 function waitForElement(selector, callback, count = 1000, interval = 250) {
    if (document.querySelector(selector)) {
      callback();
    } else if (count > 0) {
      setTimeout(function () {
        waitForElement(selector, callback, count - 1, interval);
      }, interval);
    }
  }
  waitForElement('body', function () {
    document.body.addEventListener('click', function (e) {
      if (e.target.closest('.button-selector')) {
        if (window.bucketed !== true) {
          window.bucketed = true;
          window._conv_q = window._conv_q || [];
          window._conv_q.push(["executeExperiment", "experimentID"]);
        }
      }
    });
  });
})();
Explanation
Initial Condition Check
When the page loads, the script checks if ‘window.bucketed’ is ‘true’. Since it is initially ‘undefined’, the condition fails, and the user is not included in the experiment.
Waiting for Element and Adding Event Listener
- The ‘waitForElement’ function waits for the entire document body to load and then adds an event listener to it.
- This listener checks for a click on an element matching the selector ‘.button-selector’.
Triggering the Experiment
- When the specified element ‘.button-selector’ is clicked, ‘window.bucketed’ is set to ‘true’, and the custom experiment trigger snippet is executed.
- This Custom Experiment Trigger snippet will recheck the entire experiment again, including the "Locations" and "Audiences".
- While rechecking the "Audiences", it will find that ‘window.bucketed’ is true and will then bucket the user into the experiment.
Implementation Tips
- Custom Variables: Customize the variable ‘window.bucketed’ and the event listener selector (‘.button-selector’) based on your specific use case.
- Experiment ID: Replace "experimentID" with the actual ID of your experiment.
- Event Listeners: You can add different event listeners or conditions as needed to fit your specific audience criteria.
Conclusion
By using custom JavaScript conditions, you can create highly specific and dynamic audience segments in Convert. This approach ensures that your experiments are triggered only for users who meet your precise conditions, allowing for more accurate and relevant testing.
Special thanks to Tansen and Shakil, two of our Solutions Engineers, for their expertise and insights in shaping the content and ensuring its accuracy.
We have previously shared how to create targeting conditions that are dynamic and only include a visitor when they perform certain actions. That method requires updating the Global JS (Global Project JavaScript) of Convert. There is a small challenge from a maintainability perspective.
For example, if you are running 100s of experiments, maintaining all those conditions withing Global JS might cause some unforeseen issues. This has pushed us to come up with a different approach. Utilizing the JS Audience creation, that will do the same thing, without having to touch the Global JS Convert script.
Here's a step-by-step guide on how to create a custom trigger audience using JavaScript conditions.
Steps to Create a Custom Trigger Audience
1. Create a New Audience
Go to your Convert dashboard and create a new audience. Name it something descriptive like "Open Cart Drawer".
2. Add a JavaScript Condition
Drag and drop the JavaScript condition component into the audience rules conditions.
Here is an example for how the Audience setup should look like:
3. Write a Self-Calling Function
Within the JavaScript condition, you'll need to write a function that defines your custom logic.
Here’s a sample code snippet to get you started:
(function () {
  if (window.bucketed === true) {
    return true;
  }
 function waitForElement(selector, callback, count = 1000, interval = 250) {
    if (document.querySelector(selector)) {
      callback();
    } else if (count > 0) {
      setTimeout(function () {
        waitForElement(selector, callback, count - 1, interval);
      }, interval);
    }
  }
  waitForElement('body', function () {
    document.body.addEventListener('click', function (e) {
      if (e.target.closest('.button-selector')) {
        if (window.bucketed !== true) {
          window.bucketed = true;
          window._conv_q = window._conv_q || [];
          window._conv_q.push(["executeExperiment", "experimentID"]);
        }
      }
    });
  });
})();
Explanation
Initial Condition Check
When the page loads, the script checks if ‘window.bucketed’ is ‘true’. Since it is initially ‘undefined’, the condition fails, and the user is not included in the experiment.
Waiting for Element and Adding Event Listener
- The ‘waitForElement’ function waits for the entire document body to load and then adds an event listener to it.
- This listener checks for a click on an element matching the selector ‘.button-selector’.
Triggering the Experiment
- When the specified element ‘.button-selector’ is clicked, ‘window.bucketed’ is set to ‘true’, and the custom experiment trigger snippet is executed.
- This Custom Experiment Trigger snippet will recheck the entire experiment again, including the "Locations" and "Audiences".
- While rechecking the "Audiences", it will find that ‘window.bucketed’ is true and will then bucket the user into the experiment.
Implementation Tips
- Custom Variables: Customize the variable ‘window.bucketed’ and the event listener selector (‘.button-selector’) based on your specific use case.
- Experiment ID: Replace "experimentID" with the actual ID of your experiment.
- Event Listeners: You can add different event listeners or conditions as needed to fit your specific audience criteria.
Conclusion
By using custom JavaScript conditions, you can create highly specific and dynamic audience segments in Convert. This approach ensures that your experiments are triggered only for users who meet your precise conditions, allowing for more accurate and relevant testing.
Special thanks to Tansen and Shakil, two of our Solutions Engineers, for their expertise and insights in shaping the content and ensuring its accuracy.
We know that targeting the users at the right time and at the right situation to start an experiment is extremely important. Part of an A/B Test setup, you need to target the right area of the site. Whether it is the homepage, all product details pages or your checkout funnel, in case if your targeting is not correct, you will not get the right data against the metrics that you are tracking.
In some cases, the targeting can be more sophisticated. For example, if you are running an experiment on the mini-basket or cart drawer area, you only want to start the experiment when a user opens the mini-basket. Prior to that, the users should not be part of the experiment.
In Convert testing tool, you can use the “JS Targeting Condition”. However, one challenge with this is the time limitation – we have noticed that Convert will wait for 2 minutes for that condition to be fulfilled. Once the period has exceeded, the user will not be bucketed into the experiment even if he fulfills the condition.
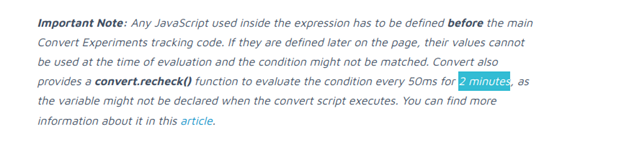
Convert JS Targeting Condition Note - stating a 2 minutes cutoff
Going back to the mini-basket example, a user might open the mini-basket after 2 minutes. And as a result, the user will not be bucketed to the experiment even though the condition is fulfilled.
How to resolve this:
Luckily, there is a way and we have found a work around to resolve this issue.
Step 1: Configure Convert Global Project JS
We need to use the Global Project JS and configure the Global Javascript.
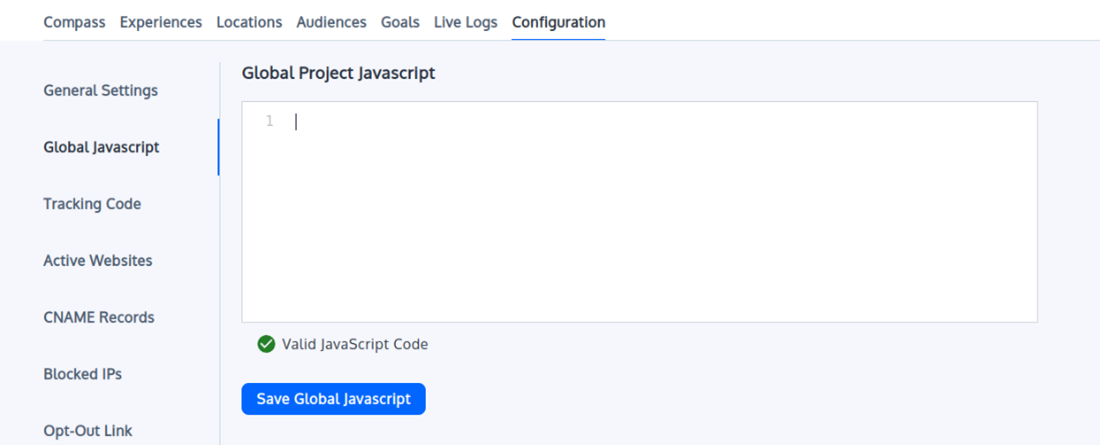
Convert - Global Project JS configuration
Step 2: Add a new mutation observer to the Global JS
Add the code below, make the necessary changes as needed:
// listen for targeted element
const targetNode = document.getElementById('element-id); // parent under which the changes occur
const config = { attributes: true, childList: true, subtree: true };
const callback = function(mutationsList, observer) {
       if (!!document.querySelector("target-element")) { // target element or trigger condition
             observer.disconnect();
             window.targetElementTouched = true;
             window._conv_q = _conv_q || [];
             window._conv_q.push(["executeExperiment","experimentId"])
      }
};
const observer = new MutationObserver(callback);
observer.observe(targetNode, config);
Step 3: Add a JS condition in the experiment Audience.
Rename targetElementTouched to the name of the element, e.g. cartDrawerElement.
window.targetElementTouched == true
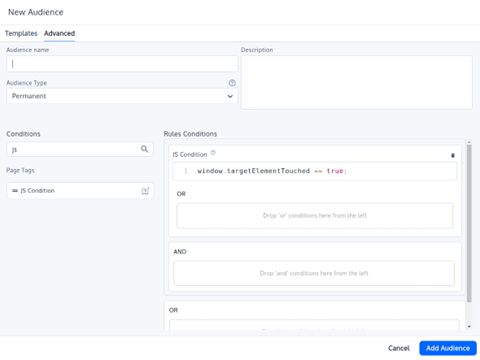
Convert JS Targeting Condition Setup
And voila – you have got the right JS targeting condition setup without having to worry about the 2 minutes rule or when the user is performing the necessary action to be bucketed into the experiment!
Summary:
In Convert, JS Condition of an experiment only runs for 2 minutes. Therefore, we cannot trigger the experiment when a user performs the action after 2 minutes of landing on the page. A MutaionObserver is added to the global project javascript which listens for the change and assigns a window variable for it. After that we can execute a particular experiment as shown above with
window._conv_q.push(["executeExperiment","experimentId"]).
The triggers for the experiment will be checked again in which case it would fulfill the condition and user will be bucketed into the experiment.
Special thanks to Raihan, one of our Software Engineer, for his expertise and insights in shaping the content and ensuring its accuracy.
We know that targeting the users at the right time and at the right situation to start an experiment is extremely important. Part of an A/B Test setup, you need to target the right area of the site. Whether it is the homepage, all product details pages or your checkout funnel, in case if your targeting is not correct, you will not get the right data against the metrics that you are tracking.
In some cases, the targeting can be more sophisticated. For example, if you are running an experiment on the mini-basket or cart drawer area, you only want to start the experiment when a user opens the mini-basket. Prior to that, the users should not be part of the experiment.
In Convert testing tool, you can use the “JS Targeting Condition”. However, one challenge with this is the time limitation – we have noticed that Convert will wait for 2 minutes for that condition to be fulfilled. Once the period has exceeded, the user will not be bucketed into the experiment even if he fulfills the condition.
Convert JS Targeting Condition Note - stating a 2 minutes cutoff
Going back to the mini-basket example, a user might open the mini-basket after 2 minutes. And as a result, the user will not be bucketed to the experiment even though the condition is fulfilled.
How to resolve this:
Luckily, there is a way and we have found a work around to resolve this issue.
Step 1: Configure Convert Global Project JS
We need to use the Global Project JS and configure the Global Javascript.
Convert - Global Project JS configuration
Step 2: Add a new mutation observer to the Global JS
Add the code below, make the necessary changes as needed:
// listen for targeted element
const targetNode = document.getElementById('element-id); // parent under which the changes occur
const config = { attributes: true, childList: true, subtree: true };
const callback = function(mutationsList, observer) {
       if (!!document.querySelector("target-element")) { // target element or trigger condition
             observer.disconnect();
             window.targetElementTouched = true;
             window._conv_q = _conv_q || [];
             window._conv_q.push(["executeExperiment","experimentId"])
      }
};
const observer = new MutationObserver(callback);
observer.observe(targetNode, config);
Step 3: Add a JS condition in the experiment Audience.
Rename targetElementTouched to the name of the element, e.g. cartDrawerElement.
window.targetElementTouched == true
Convert JS Targeting Condition Setup
And voila – you have got the right JS targeting condition setup without having to worry about the 2 minutes rule or when the user is performing the necessary action to be bucketed into the experiment!
Summary:
In Convert, JS Condition of an experiment only runs for 2 minutes. Therefore, we cannot trigger the experiment when a user performs the action after 2 minutes of landing on the page. A MutaionObserver is added to the global project javascript which listens for the change and assigns a window variable for it. After that we can execute a particular experiment as shown above with
window._conv_q.push(["executeExperiment","experimentId"]).
The triggers for the experiment will be checked again in which case it would fulfill the condition and user will be bucketed into the experiment.
Special thanks to Raihan, one of our Software Engineer, for his expertise and insights in shaping the content and ensuring its accuracy.
One of the core things that create a lot of back and forth between the developers and product owners is that the information needed about a test that needs to be developed is simply not there up front. Even though you are well versed on what the hypothesis is and what you want to test, because of the missing information, the development can be stalled. We have seen some tests that are supposed to be delivered in three days’ time, took over a week as some of the key information was missing from the original test brief.
Here are the 5 most important things that the A/B testing developers need to develop and deliver the test in the most efficient way:
1. Variation designs
Obviously! And that includes what changes need to be made, any functionalities that need to be added and / or how the changes are reflected across different devices
2. Metrics
Unless you are going to track the metrics by yourself – specify the primary KPI and all other metrics you want to track. There could be custom metrics that the A/B testing developer need to implement as part of the test development across all variations (including control!)
3. Targeting pages / screens
Where is this going to be live? Homepage? Product Listing Pages? Product Details pages? What is the URL structure? If it is a sitewide test – is it truly a sitewide? What about the checkout funnel (which can be structured differently from the rest of the site)?
4. Audiences
Who will be part of this experiment? What are the audience criteria? What about visitors coming from PPC campaigns? Are there any restrictions?
5. Edge cases / Anomalies
If a product is out of stock or on sale, the product details page is displayed differently. How is that going to be reflected for the variation? It is very easy to miss the edge cases – but for the test developer, it is important to ensure that they are covered up front
The rule is simple – the clearer the information is up front, the less time spent on unnecessary back and forth!
Black Friday? Cyber Monday? Christmas period?
Yes, I am talking about those periods when some sites get almost 10 times more traffic compared to the rest of the year. According to Adobe’s insight, in 2021, customers spent $8.9B on Black Friday alone. Yet, many companies, when it comes down to CRO and A/B testing, don’t have any plan to do something differently for those periods. Here are some pointers that should help you strategize your CRO plan to tackle the next peak period:
- Your traffic during that time is not your regular traffic. They have got certain motivation which can push through the toughest barriers to get what they are looking for.
- Your discoverability tests, i.e., navigation, filter options, homepage promo (and winners from them) are more important during this period. You need to make sure that customers are finding the products relevant to them as soon and as quickly as possible.
- Land your returning visitors straight into where they left off on their last journey – here is a test idea, that can potentially work when it is peak time – for example, if someone was visiting Men’s suits section on their last visit but did not make a purchase, land them directly to the suits product listings page on their next visit even if they typed the homepage URL.
- Run automated promo banner tests. Many testing tools support MAB (Multi Armed Bandit tests) or automated personalisation campaigns. These are the perfect period to have multiple promotional banners and launch them all together with auto traffic allocation. That way, you will potentially get the most out of your promotions that will be relevant to the end users.
- Time is of the essence – the peak periods do not last long. Plan up-front as to what you will be doing and get them ready in time. We have noticed that some of our clients started the planning in October and we started developing campaigns from the beginning of November, making sure that everything is QA’d and ready to go on certain dates!
- Highlight social messages – how many people are viewing, adding to basket and completing purchases for individual products. This is the perfect time to be transparent and create urgency amongst the visitors to your site to complete purchase.
- Pause your regular tests. And by regular tests I mean the generic A/B tests you have been running to improve your website. During that period, the behaviour of your users are not regular. There is a concept called walking in the coal effect – where the users will do whatever they need to in order to get what they are looking for – and these are the times when we behave like this. The results you will see during that period will skew the original performance impacts of the variations of your regular A/B tests. You should either pause those tests or plan to complete them before the peak period starts.
Overall, experimentation does not necessarily need to be stopped. It is the type of testing that is important to consider when you are in the peak period. Try this and see the results yourself.
“We have a strong digital team to continuously improve our digital presence in the market. Like our amazing products, we always want to provide a great customer experience across all of our digital presence. Working with EchoLogyx and getting their experienced Shopify engineer provided us the necessary resource and expertise to achieve our digital strategy and create a wonderful experience for our customers.
The team at EchoLogyx showed us how we can test different concepts before launching the changes to our website – allowing us to become a lot more data driven in order to make the rights business decisions. They have been helping us to implement and develop new apps, change templates and test different concepts on our Shopify store.
I would definitely recommend EchoLogyx without any doubt – these guys go above and beyond the call of duty to help us out with our Shopify site” – Rachael W., Founder
About Chinti and Parker
Since 2009, Chinti & Parker, a London based brand, has been dedicated to creating collections which aim to invigorate women’s wardrobes with knitwear that celebrates joyful colour, timeless shapes, and innovative texture.
Download the full case study
The Challenge
The founders of Chinti and Parker are not only visionary with their amazingly stunning knitwear range, they wanted to provide a great customer experience through their Shopify store with innovating ideas and design.
When they started the process of implementing the back-to-back changes, they noticed that the development work was extremely slow and expensive. As a result, even though they had a digital strategy in place, they were unable to delivery the changes as quickly as they were hoping.
How EchoLogyx helped Chinti and Parker’s Shopify Development
Chinti and Parker started working with EchoLogyx from early 2022. The first project was to develop a bespoke private app to integrate with their fulfilment house. The Shopify engineers from EchoLogyx went through the scoping, making sure that all the functionalities are documented and started the development work. Within just over a month, they delivered the fully functioning private app that integrated seamlessly with their fulfilment company.
Following on to this, Chinti and Parker took one full time Shopify Engineer from EchoLogyx to help them with their digital strategy. Since then, Chinti and Parker have seen their development work move significantly faster than before. This allowed them to make bigger and bolder changes to the store, creating an amazing customer experience.
On top of using the Shopify development and QA work, Chinti and Parker started to A/B test their bigger and bolder concepts. This has started to help them make better decisions based on the data and what works best for their end users.
Download the full case study to find out more.
We have recently created a new Chrome Extension to check if a particular goal is firing or not. Currently it supports 7 testing tools. The plan is to gradually increase the number of A/B testing tools to help marketers, CRO consutlants, QA engineers, and developers to QA metrics.
But why this is important?
Well - first of all, if your metrics are not firing as expected, how are you going to analyze the results of your tests? In simple terms, there is no point of running an experiment if you can't measure the performance - whether it is a button click, pageview goal or transactional metrics.
The other reasion for making sure that the metrics are working correctly up front is so that you don't lose out the days of testing - only to find at a later stage that some of them were not working as expected.
We all know that in simple terms, Conversion Rate Optimisaiton is making changes to improve specific KPIs. If you are not making sure that the metrics are being tracked properly - what's the point!
Key takeaway - QA your metrics before you launch the tests!
A simple (yet powerful) guide to AB Testing Development
Over the past decade, companies had no choice but to take the online user experience more seriously than ever before, to increase their online sales, customer loyalty and achieve their business goals.
As the online businesses race towards becoming the best amongst their competitors, CRO and AB Testing have started to play a significant role to improve digital channel performances. From large companies such as Google, Facebook, Amazon, Netflix, Microsoft to Start-ups, started experimenting with different concepts to gain additional customers or users to their website.
In this article, we are providing a simple guide to develop A/B tests. However, before doing that, it is important to understand the basics, which will help to provide a solid foundation to understand the success of CRO.
What is CRO (Conversion Rate Optimization)?
There are many definitions out there of Conversion Rate Optimization. For example, Econsultancy defines CRO as a “process of optimizing site to increase the likelihood that visitors will complete that specific action” [1] . HubSpot provides an action-focused definition of CRO by adding enabling people to take action when they visit a website. “By designing and modifying certain elements of a webpage, a business can increase the chances that site visitors will "convert" into a lead or customer before they leave”[2].
In simple terms, the definition of CRO is
“Making changes to improve metrics.”
The changes can vary from small – like a simple headline change, to large - where you could be adding a new feature to your product. The changes can be on your website, emails, mobile Apps, Search keywords, banners, or even physical entities. The ultimate thing is by making these changes, you are improving your business metrics, performance indicators or KPIs. Moreover, this process of continuous improvement of KPIs by making changes is CRO.
[1] What is conversion rate optimisation (CRO) and why do you need it? https://econsultancy.com/what-is-conversion-rate-optimisation-cro-and-why-do-you-need-it/
[2] The Beginner's Guide to Conversion Rate Optimization (CRO) https://blog.hubspot.com/marketing/conversion-rate-optimization-guide
What is A/B Testing?
As part of the CRO program, you are coming up with ideas to make changes. These change ideas are commonly known as Hypothesis.
As with any research, a hypothesis is always validated by different forms of testing. The most common form of testing a hypothesis within the CRO program is A/B Testing (or ABn Testing) where version A signifies the control or original – what is currently live, and version B is the new variation created based on the hypothesis.
A/B Testing simply helps you to check if the changes you are making are truly improving the target KPIs. It takes the metric performance of the current version and compares it with the new version where the changes have been applied.
For example, Neil – an Optimisation Consultant has completed some research on the e-commerce site he is involved with. Based on the analytics data, he identified that on the product details pages, the price of the product is presented just below the title of the product, which some users were ignoring. His idea is to change the position of this price and make it closer to the main Call to action (CTA) button so that users can see the price before adding the item to the basket and more people will complete their purchase through this website.
This is a simple example of an AB test to find out if Neil’s hypothesis is true – by moving the price closer to the CTA, more people will complete their purchase.
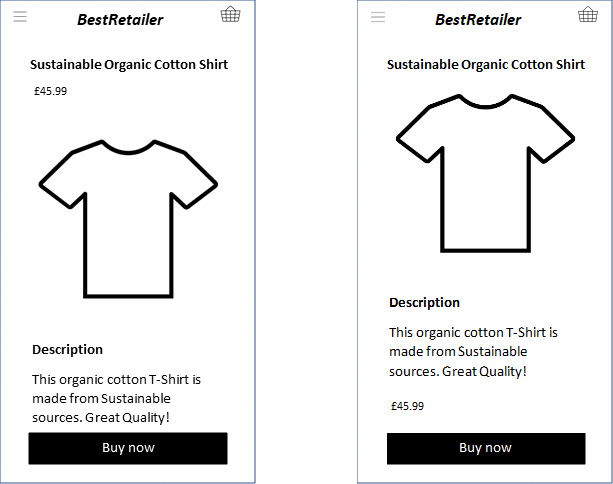
Figure 1: Example of a simple AB Test where Version A or Control where the price is just below the title of the product. Version B, where the price is just above the Buy now CTA button.
A hypothesis can create more than one variation. In such cases, your AB test becomes ABn test where A still signifies the control and after that, you have variation B, variation C and so forth to signify the other variation.
In case if you are interested in changing multiple elements and test a combination of different elements, you can setup a Multivariate Test (MVT).
Multivariate Test or MVT is a form of a test where you want to find the impact of the combinations of more than one change across multiple places within a page or site section. Let us break this definition down with an example.
Let’s go back to Neil’s research, and this time, he noticed that when visitors landed on the homepage of the best retailer website, they completely ignored the Sale link and also did not notice the key USP (see below).
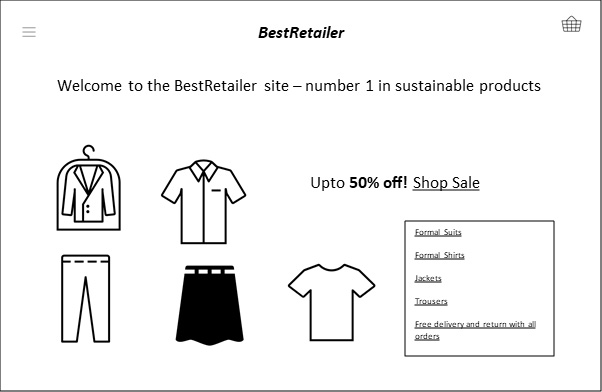
Figure 2: Example of a Multi-variate test where two different elements are going to be tested with multiple variations
He wants to test out two different versions of the Sale message against the control version:
- Control Sale message: Up to 50% off! Shop Sale
- Variation 1 Sale message: Sale now on! Get Up to 50% off
- Variation 2 Sale message: Up to 50% off! Hurry while stock lasts!
At the same time, two versions of the main heading to promote free delivery and return messaging against the control:
- Control Heading: Welcome to the Best Retailer site – number 1 in sustainable products
- Variation 1 Heading: Number 1 Sustainable Shopping site with FREE Delivery and Returns
- Variation 2 Heading: Free Delivery and Returns! Best Retailer for Sustainable products
Neil is interested in finding out not only which individual sale message or heading works best to increase the browsability and purchase, but also to see which combination of these messages work best. This is where he sets this test up as a multi-variate test or MVT to test out all of the combinations against the control.
All MVT or multi-variate tests are AB tests – with a lot of variations. For example, the total number of combinations in this example will be 9 (including the control). Each of these combinations can be considered as a variation of an AB test.
Testing tools that provide the option of setting up MVT usually gives the user some additional options – for example, excluding specific combinations and reporting on the performance of individual elements or variates.
This is another form of A/B test where you are simply redirecting the variation traffic to your newly developed page(s). One important thing to consider when setting up a redirect A/B test is to use a rel=canonical tag. This will tell Google and other search engines that the content is similar to the original URL and that your SEO ranking is not penalised when running the test.
What is Server-Side testing?
Most commonly used A/B testing methods are client-side – i.e. the changes are applied on the browser using JavaScript. This does not require any code push from the server and marketers and A/B testing developers can rely on the testing tool to set up the A/B test.
Client-side testing allows users to test almost everything. There can be cases where a hypothesis might be testing additional features – such as the pricing structure, new site search algorithm, anything that will require backend changes to the site and you cannot test them with the client-side testing. This is where server-side testing becomes handy. The backend developers can create the variation, and with the help of the testing tool, they can launch the test by splitting the traffic.
For example, let’s say Neil identified that the site search on the Best Retailer website is not returning the right set of results. The developed built a new search algorithm. But Neil wants to make sure that the new search algorithm is actually performing better in comparison to the existing search.
In this case, he requests the AB Testing development team to create a server-side test and using the server-side testing tool, the development team can launch the new version of the search alongside the existing version by splitting the traffic.
There are 5 core components of an A/B test:
- Test Plan or Test Brief
- Design of the A/B test variations
- Development of the variations
- Tool Setup
- QA
1. Test plan or Test Brief
Also sometimes known as ‘Blueprint’, a test plan or test brief should provide all the necessary information about the A/B test. It should include, but not limited to, the hypothesis, audiences, targeting conditions, URL where the test will be launched, variation information, metrics that need to be tracked, QA scenarios – i.e. anything that would define any aspect of this A/B test will need to be documented on the Test Plan. This should be treated as the reference points for everyone involved in this CRO programme to learn more about an individual test.
You can download a test plan template from here[1].
2. Design of the A/B test variations
Depending on the changes being made with the test, the design of the variations needs to be specified. Ideally, it is great if the A/B testing developers get access to the raw design files (e.g. Photoshop, Figma, Zeplin etc). That way, when the A/B Test developers are building the variations, they can rely on the exact specification from the raw file (e.g. colour code, pixel amount etc.).
If the A/B test needs to be developed across all devices (e.g. Desktop, Tablet, Mobile), then the design should specify how the variation will be displayed across all of those devices. Additionally, if there are specific scenarios that would impact how the variation will be displayed (e.g. clicking on an accordion/tab), the design should also provide information such as active state, highlighted state.
3. Development of the A/B test variations
Once the test plan and design variations are ready, A/B test developers or Solutions Engineers start the development of the variations. Depending on the changes that are being made with the variations, the test developers would write the code using JavaScript / CSS / HTML. They can use the Browser Console to run the code and check if the desired changes are happening or not. Once they are happy, they can move into the tool setup.
4. Tool Setup
Depending on the testing tool, the setup of an A/B testing tool may vary. Additionally, the type of test can also dictate the setup of the test. For example, if it is an MVT, the developer needs to define the area where the changes are being made. If it is a redirect test, then the right parameters need to be used.
The A/B testing developer also needs to think about the targeting conditions based on the test plan. Who should be targeted, where is the test going to be live, if the site is developed using SPA, what needs to be done to ensure that the experiment is running at the right location.
Metrics setup is another important part of this stage of A/B testing development. The developers need to go through the list of metrics and implement them. Note that in some testing tools, you can save the metrics and re-use the saved metrics. Whereas in some other tools, every time you create a new test, you need to create the metrics.
When implementing the metrics, A/B testing developers would need to make sure that they are tracked in variations, as well as in Control. Once this is done, the test developer will need to prepare this for QA of the variations.
5. A/B Test QA
Once the development is complete, the test must go for QA. Test QA Engineers at this stage would pick up the test plan, check the variations against the design and the test plan to make sure that the variation is rendering as it should. They will report all bugs, which will then need to go back to the developer to fix. Furthermore, once the developer fixes the bugs, they will need to go through a re-QA process.
This is a significant part of any A/B test. Without QAing the test, the test should never go live to the end-user and you can read why A/B Testing QA is really important. The last thing you want is your test becomes invalidated by a bug in the variation.
QA Engineers also need to make sure that the metrics are getting the right data in control as well as in variation. Depending on the testing tools, the way of checking metrics can vary. However, in most cases, the metrics that are being passed to the testing tool server can be found on the network tab of the browsers.
Conclusion
A/B testing comes in different forms. However, all tests have some fundamental components – and they will define the quality of the tests that you are building for your CRO / Experimentation program.
A simple (yet powerful) guide to AB Testing Development
Over the past decade, companies had no choice but to take the online user experience more seriously than ever before, to increase their online sales, customer loyalty and achieve their business goals.
As the online businesses race towards becoming the best amongst their competitors, CRO and AB Testing have started to play a significant role to improve digital channel performances. From large companies such as Google, Facebook, Amazon, Netflix, Microsoft to Start-ups, started experimenting with different concepts to gain additional customers or users to their website.
In this article, we are providing a simple guide to develop A/B tests. However, before doing that, it is important to understand the basics, which will help to provide a solid foundation to understand the success of CRO.
What is CRO (Conversion Rate Optimization)?
There are many definitions out there of Conversion Rate Optimization. For example, Econsultancy defines CRO as a “process of optimizing site to increase the likelihood that visitors will complete that specific action” [1] . HubSpot provides an action-focused definition of CRO by adding enabling people to take action when they visit a website. “By designing and modifying certain elements of a webpage, a business can increase the chances that site visitors will "convert" into a lead or customer before they leave”[2].
In simple terms, the definition of CRO is
“Making changes to improve metrics.”
The changes can vary from small – like a simple headline change, to large - where you could be adding a new feature to your product. The changes can be on your website, emails, mobile Apps, Search keywords, banners, or even physical entities. The ultimate thing is by making these changes, you are improving your business metrics, performance indicators or KPIs. Moreover, this process of continuous improvement of KPIs by making changes is CRO.
[1] What is conversion rate optimisation (CRO) and why do you need it? https://econsultancy.com/what-is-conversion-rate-optimisation-cro-and-why-do-you-need-it/
[2] The Beginner's Guide to Conversion Rate Optimization (CRO) https://blog.hubspot.com/marketing/conversion-rate-optimization-guide
What is A/B Testing?
As part of the CRO program, you are coming up with ideas to make changes. These change ideas are commonly known as Hypothesis.
As with any research, a hypothesis is always validated by different forms of testing. The most common form of testing a hypothesis within the CRO program is A/B Testing (or ABn Testing) where version A signifies the control or original – what is currently live, and version B is the new variation created based on the hypothesis.
A/B Testing simply helps you to check if the changes you are making are truly improving the target KPIs. It takes the metric performance of the current version and compares it with the new version where the changes have been applied.
For example, Neil – an Optimisation Consultant has completed some research on the e-commerce site he is involved with. Based on the analytics data, he identified that on the product details pages, the price of the product is presented just below the title of the product, which some users were ignoring. His idea is to change the position of this price and make it closer to the main Call to action (CTA) button so that users can see the price before adding the item to the basket and more people will complete their purchase through this website.
This is a simple example of an AB test to find out if Neil’s hypothesis is true – by moving the price closer to the CTA, more people will complete their purchase.
Figure 1: Example of a simple AB Test where Version A or Control where the price is just below the title of the product. Version B, where the price is just above the Buy now CTA button.
A hypothesis can create more than one variation. In such cases, your AB test becomes ABn test where A still signifies the control and after that, you have variation B, variation C and so forth to signify the other variation.
In case if you are interested in changing multiple elements and test a combination of different elements, you can setup a Multivariate Test (MVT).
Multivariate Test or MVT is a form of a test where you want to find the impact of the combinations of more than one change across multiple places within a page or site section. Let us break this definition down with an example.
Let’s go back to Neil’s research, and this time, he noticed that when visitors landed on the homepage of the best retailer website, they completely ignored the Sale link and also did not notice the key USP (see below).
Figure 2: Example of a Multi-variate test where two different elements are going to be tested with multiple variations
He wants to test out two different versions of the Sale message against the control version:
- Control Sale message: Up to 50% off! Shop Sale
- Variation 1 Sale message: Sale now on! Get Up to 50% off
- Variation 2 Sale message: Up to 50% off! Hurry while stock lasts!
At the same time, two versions of the main heading to promote free delivery and return messaging against the control:
- Control Heading: Welcome to the Best Retailer site – number 1 in sustainable products
- Variation 1 Heading: Number 1 Sustainable Shopping site with FREE Delivery and Returns
- Variation 2 Heading: Free Delivery and Returns! Best Retailer for Sustainable products
Neil is interested in finding out not only which individual sale message or heading works best to increase the browsability and purchase, but also to see which combination of these messages work best. This is where he sets this test up as a multi-variate test or MVT to test out all of the combinations against the control.
All MVT or multi-variate tests are AB tests – with a lot of variations. For example, the total number of combinations in this example will be 9 (including the control). Each of these combinations can be considered as a variation of an AB test.
Testing tools that provide the option of setting up MVT usually gives the user some additional options – for example, excluding specific combinations and reporting on the performance of individual elements or variates.
This is another form of A/B test where you are simply redirecting the variation traffic to your newly developed page(s). One important thing to consider when setting up a redirect A/B test is to use a rel=canonical tag. This will tell Google and other search engines that the content is similar to the original URL and that your SEO ranking is not penalised when running the test.
What is Server-Side testing?
Most commonly used A/B testing methods are client-side – i.e. the changes are applied on the browser using JavaScript. This does not require any code push from the server and marketers and A/B testing developers can rely on the testing tool to set up the A/B test.
Client-side testing allows users to test almost everything. There can be cases where a hypothesis might be testing additional features – such as the pricing structure, new site search algorithm, anything that will require backend changes to the site and you cannot test them with the client-side testing. This is where server-side testing becomes handy. The backend developers can create the variation, and with the help of the testing tool, they can launch the test by splitting the traffic.
For example, let’s say Neil identified that the site search on the Best Retailer website is not returning the right set of results. The developed built a new search algorithm. But Neil wants to make sure that the new search algorithm is actually performing better in comparison to the existing search.
In this case, he requests the AB Testing development team to create a server-side test and using the server-side testing tool, the development team can launch the new version of the search alongside the existing version by splitting the traffic.
There are 5 core components of an A/B test:
- Test Plan or Test Brief
- Design of the A/B test variations
- Development of the variations
- Tool Setup
- QA
1. Test plan or Test Brief
Also sometimes known as ‘Blueprint’, a test plan or test brief should provide all the necessary information about the A/B test. It should include, but not limited to, the hypothesis, audiences, targeting conditions, URL where the test will be launched, variation information, metrics that need to be tracked, QA scenarios – i.e. anything that would define any aspect of this A/B test will need to be documented on the Test Plan. This should be treated as the reference points for everyone involved in this CRO programme to learn more about an individual test.
You can download a test plan template from here[1].
2. Design of the A/B test variations
Depending on the changes being made with the test, the design of the variations needs to be specified. Ideally, it is great if the A/B testing developers get access to the raw design files (e.g. Photoshop, Figma, Zeplin etc). That way, when the A/B Test developers are building the variations, they can rely on the exact specification from the raw file (e.g. colour code, pixel amount etc.).
If the A/B test needs to be developed across all devices (e.g. Desktop, Tablet, Mobile), then the design should specify how the variation will be displayed across all of those devices. Additionally, if there are specific scenarios that would impact how the variation will be displayed (e.g. clicking on an accordion/tab), the design should also provide information such as active state, highlighted state.
3. Development of the A/B test variations
Once the test plan and design variations are ready, A/B test developers or Solutions Engineers start the development of the variations. Depending on the changes that are being made with the variations, the test developers would write the code using JavaScript / CSS / HTML. They can use the Browser Console to run the code and check if the desired changes are happening or not. Once they are happy, they can move into the tool setup.
4. Tool Setup
Depending on the testing tool, the setup of an A/B testing tool may vary. Additionally, the type of test can also dictate the setup of the test. For example, if it is an MVT, the developer needs to define the area where the changes are being made. If it is a redirect test, then the right parameters need to be used.
The A/B testing developer also needs to think about the targeting conditions based on the test plan. Who should be targeted, where is the test going to be live, if the site is developed using SPA, what needs to be done to ensure that the experiment is running at the right location.
Metrics setup is another important part of this stage of A/B testing development. The developers need to go through the list of metrics and implement them. Note that in some testing tools, you can save the metrics and re-use the saved metrics. Whereas in some other tools, every time you create a new test, you need to create the metrics.
When implementing the metrics, A/B testing developers would need to make sure that they are tracked in variations, as well as in Control. Once this is done, the test developer will need to prepare this for QA of the variations.
5. A/B Test QA
Once the development is complete, the test must go for QA. Test QA Engineers at this stage would pick up the test plan, check the variations against the design and the test plan to make sure that the variation is rendering as it should. They will report all bugs, which will then need to go back to the developer to fix. Furthermore, once the developer fixes the bugs, they will need to go through a re-QA process.
This is a significant part of any A/B test. Without QAing the test, the test should never go live to the end-user and you can read why A/B Testing QA is really important. The last thing you want is your test becomes invalidated by a bug in the variation.
QA Engineers also need to make sure that the metrics are getting the right data in control as well as in variation. Depending on the testing tools, the way of checking metrics can vary. However, in most cases, the metrics that are being passed to the testing tool server can be found on the network tab of the browsers.
Conclusion
A/B testing comes in different forms. However, all tests have some fundamental components – and they will define the quality of the tests that you are building for your CRO / Experimentation program.
A/B testing is the practice of showing two variants of the same web page to different segments of visitors at the same time and comparing which variant drives more conversions. In an A/B test, the most important thing is goals that decide a winning test. So, if can we do proper QA/Troubleshoot to check each goal are working that will serve our AB tasting purpose well.
We work hard to make AB test work in properly, but sometimes technology doesn’t work the way you expect it to. For those less-happy moments, VWO provides several ways to troubleshoot your experiment or campaign.
Tools for QA:
- Result page: helps you to view result for each goal and the good news is that it updates the result immediately.
- Network console: helps you verify whether events in a live experiment are firing correctly.
- Browser cookie: helps you verify whether events in a live experiment are firing correctly. It’s stored all the information about all types of goals.
Among all of them, I will say the browser cookie is your best friend. This contains all the information that developers need for troubleshooting experiments, audiences and goals QA.
Browser cookie:
VWO log all records events that occur as you interact with a page on your browser’s cookie. When you trigger an event in VWO it fires a tracking call and stores that information on the browser’s cookie.
To access on browser cookie tab:
- Right-click on the page. From the dropdown menu, select Inspect in Chrome or Inspect Element in Firefox.
- Select the Application/Storage tab.
- Select the Cookies tab.
- Select the Domain name of your site.
- Filter with “_vis_opt_exp_”.
- More specific for a campaign filter with “_vis_opt_exp_{CAMPAIGNID}_goal_”.
You can see the list of all events (all types of goals like click, custom, transection etc) that fired. VWO has a specific number of each goal. I have highlighted the events for few goals on the below screenshot.

VWO stores almost all information (that needed for a developer to troubleshoot) in the browser cookies; like experiments, audiences/segments, goals, users, referrers, session etc. You can find the details about VWO cookies from here.
Network console:
The network panel is a log in your browser that records events that occur as you interact with a page. When you trigger an event in VWO it fires a tracking call, which is picked up in the network traffic.
To access on network tab:
- Right-click on the page. From the dropdown menu, select Inspect in Chrome or Inspect Element in Firefox.
- Select the Network tab.
- Filter with “ping_tpc”.
- Click to fire the event you'd like to see the details.
You can see the list of all events that fired. I have highlighted the event that has a specific experiment and goal ID on the below screenshot.

Note: If have already bucketed in an experiment and fired few goals you might not see any network calls. So always go to a fresh incognito browser to troubleshoot goals/experiments.
As VWO immediately update campaign results so it’s always another good option to check result page. But make sure you are the only visitor at that time who is seeing the experiment.
A/B testing is the practice of showing two variants of the same web page to different segments of visitors at the same time and comparing which variant drives more conversions. In an A/B test, the most important thing is goals that decide a winning test. So, if can we do proper QA/Troubleshoot to check each goal are working that will serve our AB tasting purpose well.
We work hard to make AB test work in properly, but sometimes technology doesn’t work the way you expect it to. For those less-happy moments, VWO provides several ways to troubleshoot your experiment or campaign.
Tools for QA:
- Result page: helps you to view result for each goal and the good news is that it updates the result immediately.
- Network console: helps you verify whether events in a live experiment are firing correctly.
- Browser cookie: helps you verify whether events in a live experiment are firing correctly. It’s stored all the information about all types of goals.
Among all of them, I will say the browser cookie is your best friend. This contains all the information that developers need for troubleshooting experiments, audiences and goals QA.
Browser cookie:
VWO log all records events that occur as you interact with a page on your browser’s cookie. When you trigger an event in VWO it fires a tracking call and stores that information on the browser’s cookie.
To access on browser cookie tab:
- Right-click on the page. From the dropdown menu, select Inspect in Chrome or Inspect Element in Firefox.
- Select the Application/Storage tab.
- Select the Cookies tab.
- Select the Domain name of your site.
- Filter with “_vis_opt_exp_”.
- More specific for a campaign filter with “_vis_opt_exp_{CAMPAIGNID}_goal_”.
You can see the list of all events (all types of goals like click, custom, transection etc) that fired. VWO has a specific number of each goal. I have highlighted the events for few goals on the below screenshot.
VWO stores almost all information (that needed for a developer to troubleshoot) in the browser cookies; like experiments, audiences/segments, goals, users, referrers, session etc. You can find the details about VWO cookies from here.
Network console:
The network panel is a log in your browser that records events that occur as you interact with a page. When you trigger an event in VWO it fires a tracking call, which is picked up in the network traffic.
To access on network tab:
- Right-click on the page. From the dropdown menu, select Inspect in Chrome or Inspect Element in Firefox.
- Select the Network tab.
- Filter with “ping_tpc”.
- Click to fire the event you'd like to see the details.
You can see the list of all events that fired. I have highlighted the event that has a specific experiment and goal ID on the below screenshot.
Note: If have already bucketed in an experiment and fired few goals you might not see any network calls. So always go to a fresh incognito browser to troubleshoot goals/experiments.
As VWO immediately update campaign results so it’s always another good option to check result page. But make sure you are the only visitor at that time who is seeing the experiment.
A/B testing is a marketing technique that involves comparing two versions of a web page or application to see which performs better. AB test developing within AB Tasty has few parallels with conventional front-end development. Where the most important thing is goals that decide a winning test. So, if can we do proper QA/Troubleshoot to check each goal are working that will serve our AB tasting purpose well.
We work hard to make AB test work in properly, but sometimes technology doesn’t work the way you expect it to. For those less-happy moments, AB Tasty provides several ways to troubleshoot your experiment or campaign.
Tools for QA:
- Preview link: helps you to view variation and move one variation to another, you can also track click goals by enabling “Display Click tracking info’s”.
- Network console: helps you verify whether events in a live experiment are firing correctly.
- Local storage: helps you verify whether events in a live experiment are firing correctly. It’s stored all the information about all click & custom goals.
Among all of them, I will say the network tab is your best friend. This contains all the information that developers need for troubleshooting experiments, audiences, goals QA and code execution on page load.
Network console:
The network panel is a log in your browser that records events that occur as you interact with a page. When you trigger an event in AB Tasty it fires a tracking call, which is picked up in the network traffic.
To access on network tab:
- Right-click on the page. From the dropdown menu, select Inspect in Chrome or Inspect Element in Firefox.
- Select the Network tab.
- Filter with “datacollectAT” or “ariane.abtasty”.
- Click to fire the event you'd like to see the details.
You can see the list of all events(click/custom/transection) that fired. I have highlighted the events name for click/custom goals on the bellow screenshot.
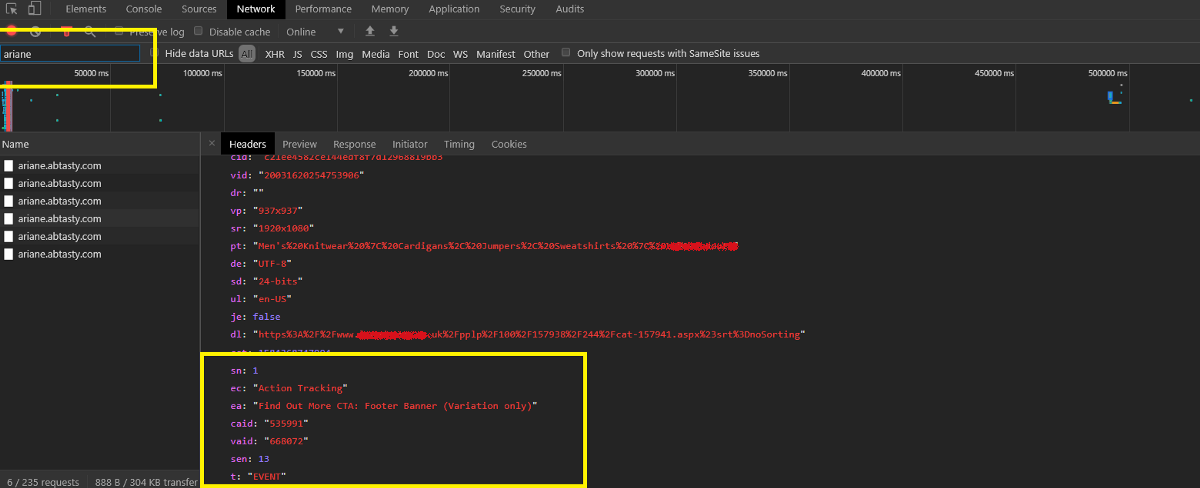
Custom goals are work with the same API call as click goals (so it’s also tracked as an event). That's why we add a text ‘Custom’ before all custom goals to differentiate between click and custom goals.
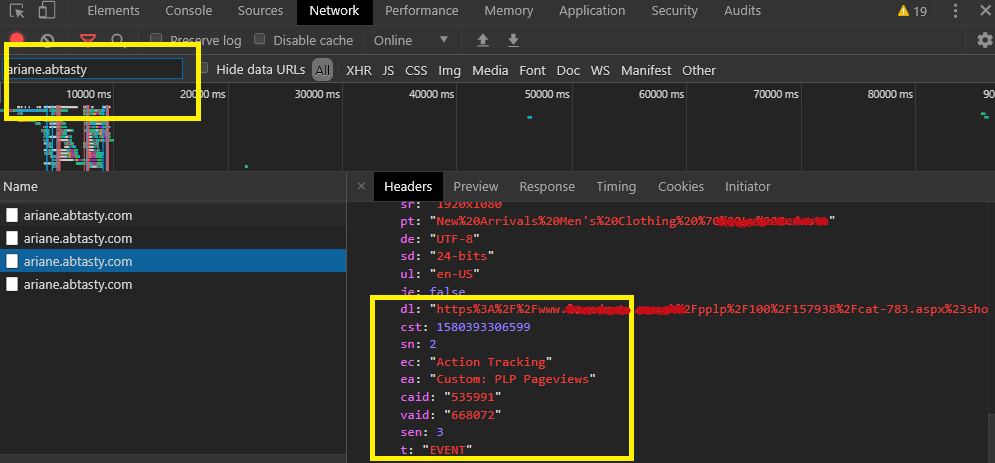
You can see the list of custom events that fired on the bellow screenshot.
Local storage:
AB tasty log all records events that occur as you interact with a page on your browser Local storage. When you trigger an event in AB Tasty it fires a tracking call and stores that information on browser local storage.
To access on Local storage tab:
- Right-click on the page. From the dropdown menu, select Inspect in Chrome or Inspect Element in Firefox.
- Select the Application/Storage tab.
- Select the Local storage tab.
- Select the Domain name of your site.
- Filter with “ABTastyData”.
- Click to ABTastyData you'd like to see the details.
You can see the list of all events(click/custom/transection) that fired. I have highlighted the events name for click/custom goals on the bellow screenshot.
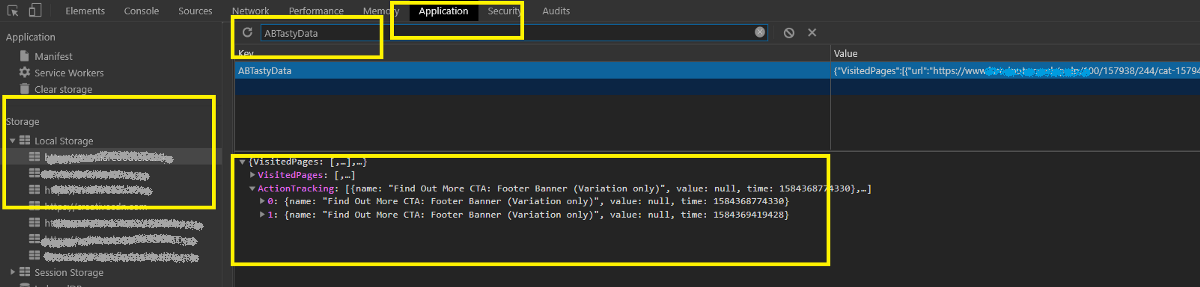
Note: For pageview goal, we have to rely on AB Tasty campaign result page, but the bad news is that it does not update immediately, need to wait 3-4 hours to see the reflections.
We cannot check pageview for AB Tasty by Network console/ Local storage as it’s work differently; It’s tracked the page URL for each of the page and record under each campaign(It has other benefits, like; we can filter the result with any URL without adding it as a pageview goal). AB Tasty manipulates all the goal along with the pageview goals in a certain period and updates that specific campaign results.
A/B testing is a marketing technique that involves comparing two versions of a web page or application to see which performs better. AB test developing within AB Tasty has few parallels with conventional front-end development. Where the most important thing is goals that decide a winning test. So, if can we do proper QA/Troubleshoot to check each goal are working that will serve our AB tasting purpose well.
We work hard to make AB test work in properly, but sometimes technology doesn’t work the way you expect it to. For those less-happy moments, AB Tasty provides several ways to troubleshoot your experiment or campaign.
Tools for QA:
- Preview link: helps you to view variation and move one variation to another, you can also track click goals by enabling “Display Click tracking info’s”.
- Network console: helps you verify whether events in a live experiment are firing correctly.
- Local storage: helps you verify whether events in a live experiment are firing correctly. It’s stored all the information about all click & custom goals.
Among all of them, I will say the network tab is your best friend. This contains all the information that developers need for troubleshooting experiments, audiences, goals QA and code execution on page load.
Network console:
The network panel is a log in your browser that records events that occur as you interact with a page. When you trigger an event in AB Tasty it fires a tracking call, which is picked up in the network traffic.
To access on network tab:
- Right-click on the page. From the dropdown menu, select Inspect in Chrome or Inspect Element in Firefox.
- Select the Network tab.
- Filter with “datacollectAT” or “ariane.abtasty”.
- Click to fire the event you'd like to see the details.
You can see the list of all events(click/custom/transection) that fired. I have highlighted the events name for click/custom goals on the bellow screenshot.
Custom goals are work with the same API call as click goals (so it’s also tracked as an event). That's why we add a text ‘Custom’ before all custom goals to differentiate between click and custom goals.
You can see the list of custom events that fired on the bellow screenshot.
Local storage:
AB tasty log all records events that occur as you interact with a page on your browser Local storage. When you trigger an event in AB Tasty it fires a tracking call and stores that information on browser local storage.
To access on Local storage tab:
- Right-click on the page. From the dropdown menu, select Inspect in Chrome or Inspect Element in Firefox.
- Select the Application/Storage tab.
- Select the Local storage tab.
- Select the Domain name of your site.
- Filter with “ABTastyData”.
- Click to ABTastyData you'd like to see the details.
You can see the list of all events(click/custom/transection) that fired. I have highlighted the events name for click/custom goals on the bellow screenshot.
Note: For pageview goal, we have to rely on AB Tasty campaign result page, but the bad news is that it does not update immediately, need to wait 3-4 hours to see the reflections.
We cannot check pageview for AB Tasty by Network console/ Local storage as it’s work differently; It’s tracked the page URL for each of the page and record under each campaign(It has other benefits, like; we can filter the result with any URL without adding it as a pageview goal). AB Tasty manipulates all the goal along with the pageview goals in a certain period and updates that specific campaign results.