
Introduction
When integrating custom pixels with Google Tag Manager (GTM) after upgrading to Shopify's new checkout extensibility, we encountered an unexpected challenge in Google Analytics 4 (GA4). Our landing pages were being tracked with a peculiar URL structure, hindering our ability to analyze data effectively. This guide will walk you through the problem we faced and the solution we implemented.
The Problem: Sandbox URLs in GA4
After implementing custom pixels, we noticed our GA4 reports showed landing page URLs that looked like this: 👇
/wpm@f69b9fb6w3396cff1pe45e79a7m2cbe3366/custom/web-pixel-41812133@131/sandbox/modern/checkouts/cn/Z2NwLXVzLWVhc3QxOjAxSjZES01UWEdLNFhOUk1FSFBCTjVFOTMx/information
This occurred because the custom pixel code runs within a sandbox (iframe), and GA4 was capturing the iframe's URL instead of the actual page URL.
👆 Note: WPM in the URL stands for Web Pixel Manager.
The Solution: A Four-Step Approach
To resolve this issue, we developed a four-step solution that involves customizing both the Shopify pixel and Google Tag Manager setup. Here's a high-level overview:
- Disable automatic
page_viewevents in GA4 - Subscribe to Shopify's
page_viewedevent - Create a custom GTM trigger
- Manually send
page_viewevents to GA4
Let's dive into each step in detail.
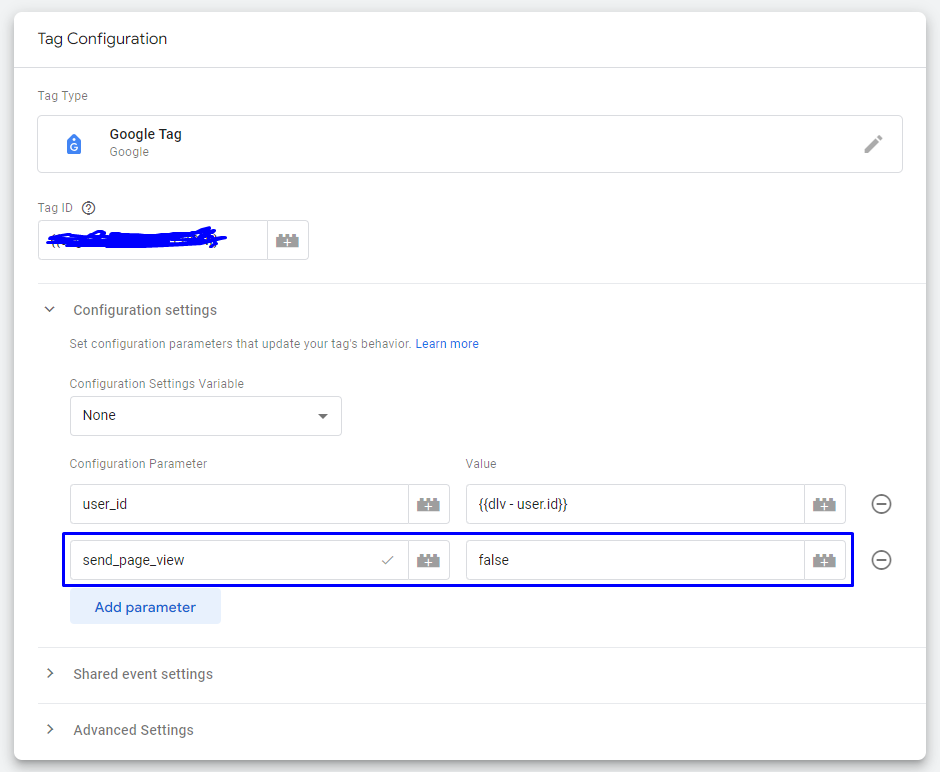
Step 1: Disable Automatic page_view Events in GA4
First, we needed to prevent GA4 from automatically sending page_view events with the incorrect URL. Here's how:
- Open your Google Tag Manager container
- Locate your GA4 configuration tag
- Set the
send_page_viewparameter tofalse
This modification stops GA4 from automatically sending page view events, allowing us to control when and how these events are sent.
Step 2: Subscribe to Shopify's page_viewed Event
Next, we tapped into Shopify's built-in events system. We subscribed to the page_viewed event and used it to push a custom event to the dataLayer with the correct page information.
Add the following code to your custom pixel:
analytics.subscribe("page_viewed", (event) => {
  window.dataLayer.push({
    event: "page_viewed",
    page_location: event.context.window.location.href, // 👉 Correct URL
    page_title: event.context.document.title,
  });
});
This code captures the correct URL and page title, then pushes them to the dataLayer for GTM to use.
Step 3: Create a Custom GTM Trigger
With the correct data now in the dataLayer, we need to tell GTM when to use this information. We do this by creating a custom trigger:
- In GTM, go to Triggers > New
- Choose "Custom Event" as the trigger type
- Set the event name to
page_viewed(matching the event name in our code) - Save the trigger
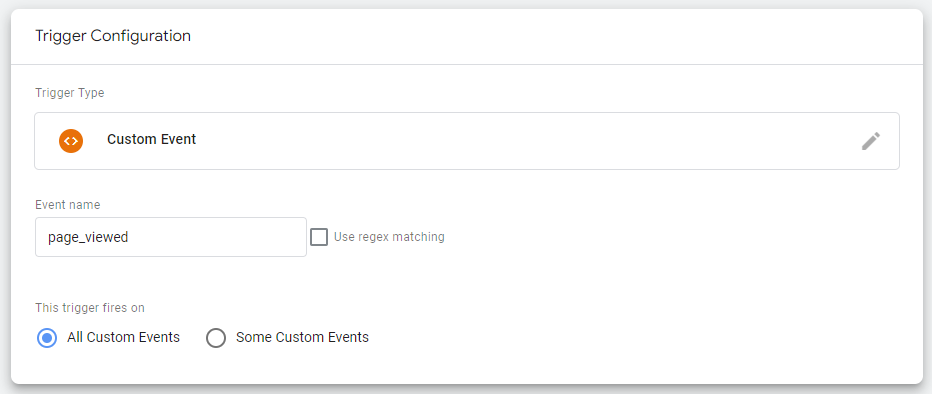
This trigger will fire whenever our custom page_viewed event is pushed to the dataLayer.
Step 4: Manually Send page_view Events to GA4
Finally, we create a custom tag in GTM to send the page_view event to GA4 with the correct information:
- In GTM, go to Tags > New
- Choose "Google Analytics: GA4 Event" as the tag type
- Set the event name to
page_view - Add two parameters:
- page_location:
{{page_location}} - page_title:
{{page_title}}
- page_location:
- Set the trigger to the custom
page_viewedtrigger we created in Step 3 - Save and publish your changes
This tag sends a page_view event to GA4 with the correct URL and page title whenever our custom trigger fires.
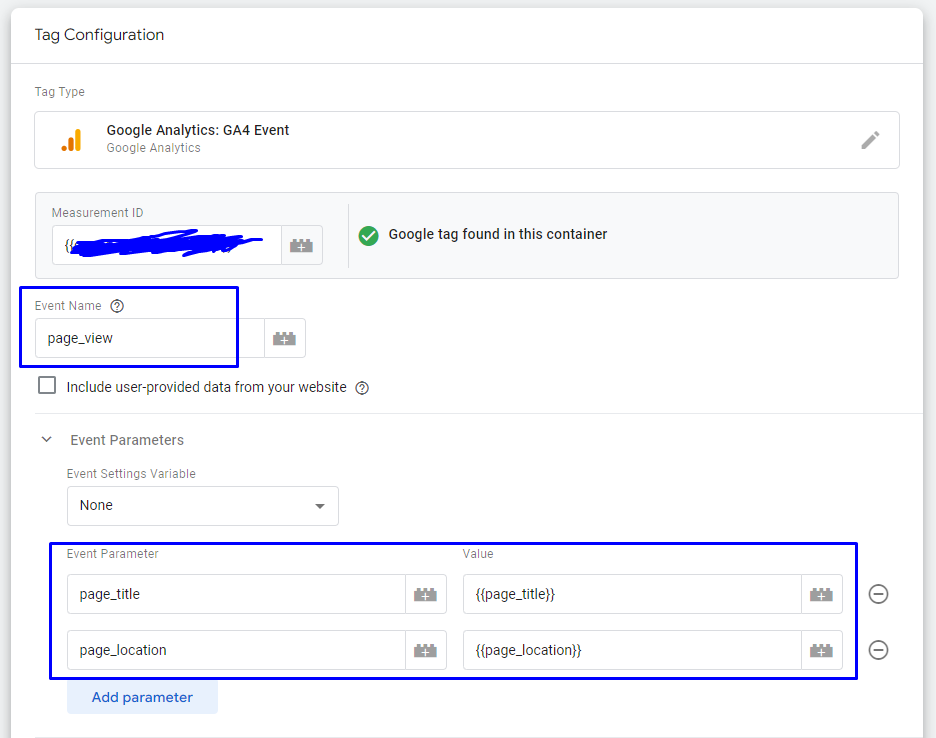
Above, we’ve used GTM variables {{page_title}} and {{page_location}} for our event parameters.
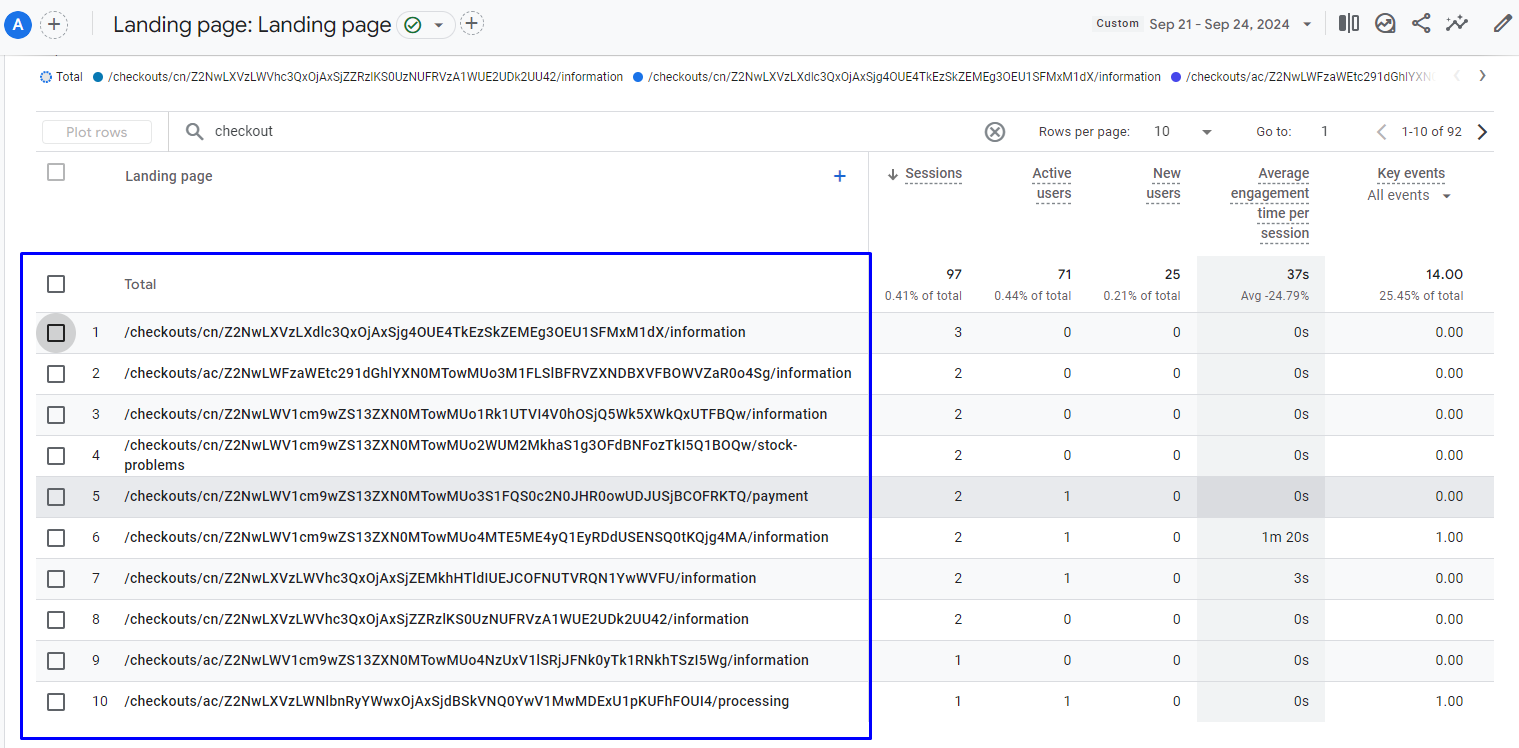
The Result: Clean and Accurate Data in GA4
After implementing these changes, our GA4 reports now show the correct URLs for our landing pages. This allows for more accurate analysis and reporting of user behavior on our Shopify store.
Conclusion
By taking control of how page view events are sent to GA4, we've overcome the challenges posed by Shopify's sandbox environment for custom pixels. This solution ensures that our analytics data accurately reflects user journeys through our store, enabling more informed decision-making and optimization efforts.
While this solution worked for our specific setup, it's always important to test it thoroughly in your own environment and consult with analytics experts. Our team at EchoLogyx are well equipped to implement this for our clients, please feel free to Contact Us